This is our 17th episode of AWS Made Easy – Ask Us Anything. And, we have developed a bit of automation using AWS, that we would like to share with you. This automation uses AWS to power many of the tasks involved in planning a livestream. This starts with the planning and scheduling process, the livestream itself, and
In this blogpost, part 1 of a 3 part series, we cover:
- Phases of a livestream
- Organizing a Livestream Using ClickUp
- Using webhooks to power the automation
- Scheduling the livestream in Google Calendar using DevFlows
- Planning the livestream and generating transitions using Lambda and ShotStack
- Using Rekognition Segment Detection API to detect the the timestamps of the segments
Phases of a Livestream
Before we talk about automation, let’s get on the same page in terms of terminology. After doing several livestreams, a few distinct phases emerged. Where we have landed now is:
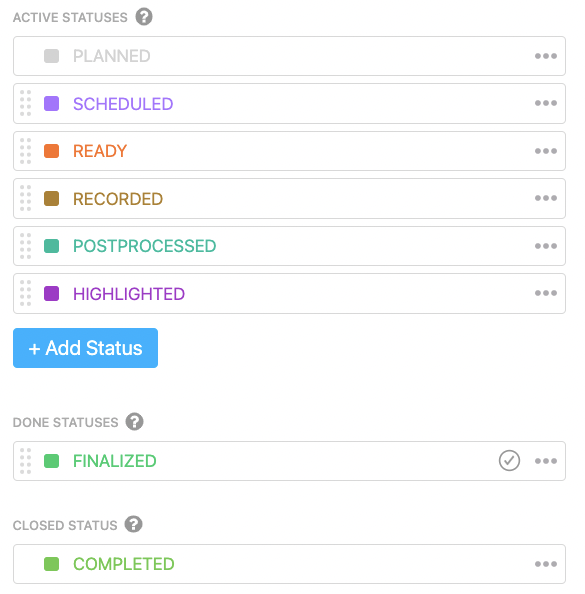
- Planned – At this stage, the livestream is just an idea. It may be for a particular episode, a guest interview, a topic to cover. A livestream in the Planned state is the seed of an idea.
- Scheduled – To advance from Planned to Scheduled, we need to have secured a date. We would also need to know if we have any guests that are coming, and the associated information about the guests.
- Ready – A livestream in the ready state has everything ready to be recorded. It has been promoted on our social media channels. A livestream in the ready state is, as the state name describes, ready to go. It just hasn’t happened yet.
- Recorded – Once the livestream has occurred, then it can enter into the “Recorded” state. In order to enter the recorded state, we will need the .mp4 file of the recorded livestream.
- Postprocessed – Once the livestream is done, it needs to be postprocessed. This means making sure it is uploaded to social channels, divided into highlights, thumbnails made for the highlights, etc.
- Highlighted – After all of the postprocessing tasks are done, the task moves into highlighted. This means that all of the highlights are ready to share with social media, and have also been created on Twitch.
- Finalized – All of the highlights have been uploaded to YouTube, scheduled to be shared to social media, and it is on our radar as a current “recent episode” be be shared.
- Completed
As a livestream advances through each state, there are certain conditions that have to be met, data to be gathered, and tasks that need to be done.
We use automation to:
- Validate that we have sufficient data to advance from one state to another.
- Create TODO tasks for manual tasks which need to be done before advancing to the next stage
- Automatically perform any task that can be automated, and record the results as data.
Why go through all of this trouble?
I like to think about it like a Kanban board. The stream is a task that proceeds through different phases. At each phase, there is data that needs to be gathered, and related tasks which need to be completed. Once certain conditions are met, the task can move to the next phase.
When I wrote down the FULL document for how this works, what pieces of information we needed, it ended up being more than a hundred pieces of discrete information and subtasks which need to be gathered and processed to move on to the next phase.
I took that principle and generalized it. The main idea is that I have some software, in this case ClickUp, which is a TODO list tracker. It is actually a whole lot more than that, but you can think about it like a programmable Kanban board. Also, note, the way I named my states, I am thinking about the state of that task as it enters that state. So, a state that enters the scheduled state is already scheduled.
The general principle is a state transition diagram from one state to another like the following:
Well, early in the livestream, I was having trouble managing all of the dependencies. For example, say I wanted to make a post on Twitter promoting the event. Well, to do that I want a banner with a headshot of the guest, as well as a LinkedIn event. But, in order to make a LinkedIn event, I need to have created it in StreamYard first. So, I was always finding myself reverse engineering the dependencies in my mind. And, I’m just not clever enough to track it all in my head. After making the flowchart and writing everything down, there were more than 100 discrete pieces of data, transformations, and steps that I wanted to do. To do this reliably and repeatedly, I needed software, and this brings me to ClickUp.
Organizing a Livestream Using ClickUp
ClickUp is one of my favorite tools. You can think of it as a programmable Kanban board. I use it to organize nearly everything. What I like about ClickUp is that it really manages the complexity well. By that, I mean that it can be used effectively by non-programmers (and I would guess that the majority of its users aren’t programmers). At the same time, its API is very clean, and for programmers it offers a playground to add automations while not worrying about a UI. In a sense, it is concurrent with our principle of focusing on the core business logic, and not getting bogged down by the more “utilitarian” components.
For my usage of ClickUp, I can represent the states of a livestream as different statuses within a List. From inside ClickUP, the statuses look like this:
My favorite part of ClickUp, which we will use throughout the rest of the article, is that it allows us to call webhooks, triggered by state transitions. We will be using these webhooks to trigger our automation.
Using webhooks to power the automation
For those of you new to automation, much of it is driven by webhooks. Webhooks are the glue that allows different services to talk to each other.
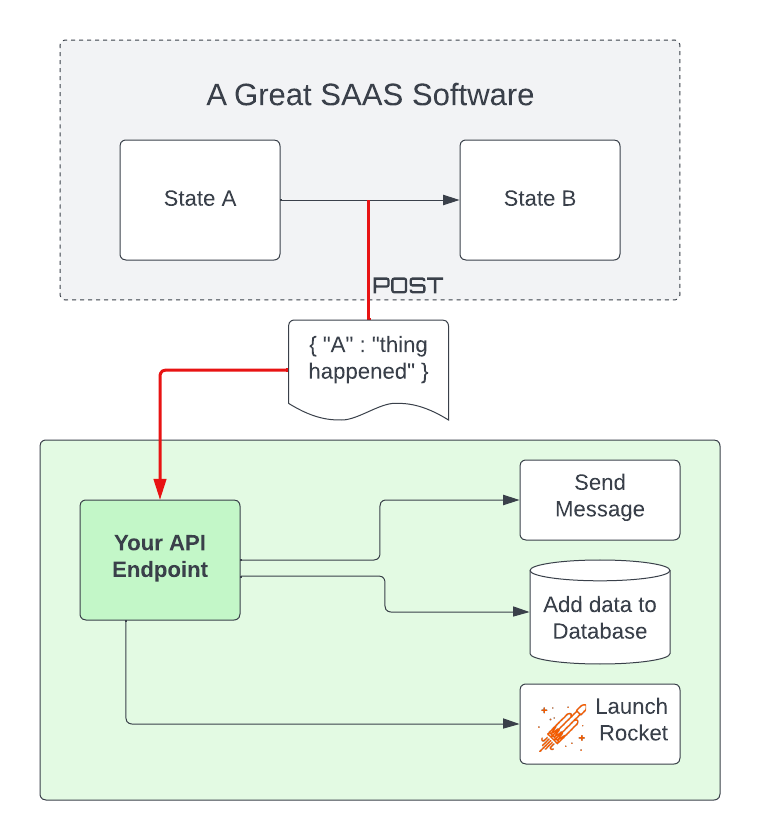
The idea of a webhook from the perspective of a service provider is that you would like to be able to provide a mechanism for a change inside your service to trigger some action outside your service. You provide a URL and, usually, a set of conditions under which the webbook is called, and then the SAAS is responsible for calling the webhook under those conditions, hopefully with a useful payload full of data about what just happened.
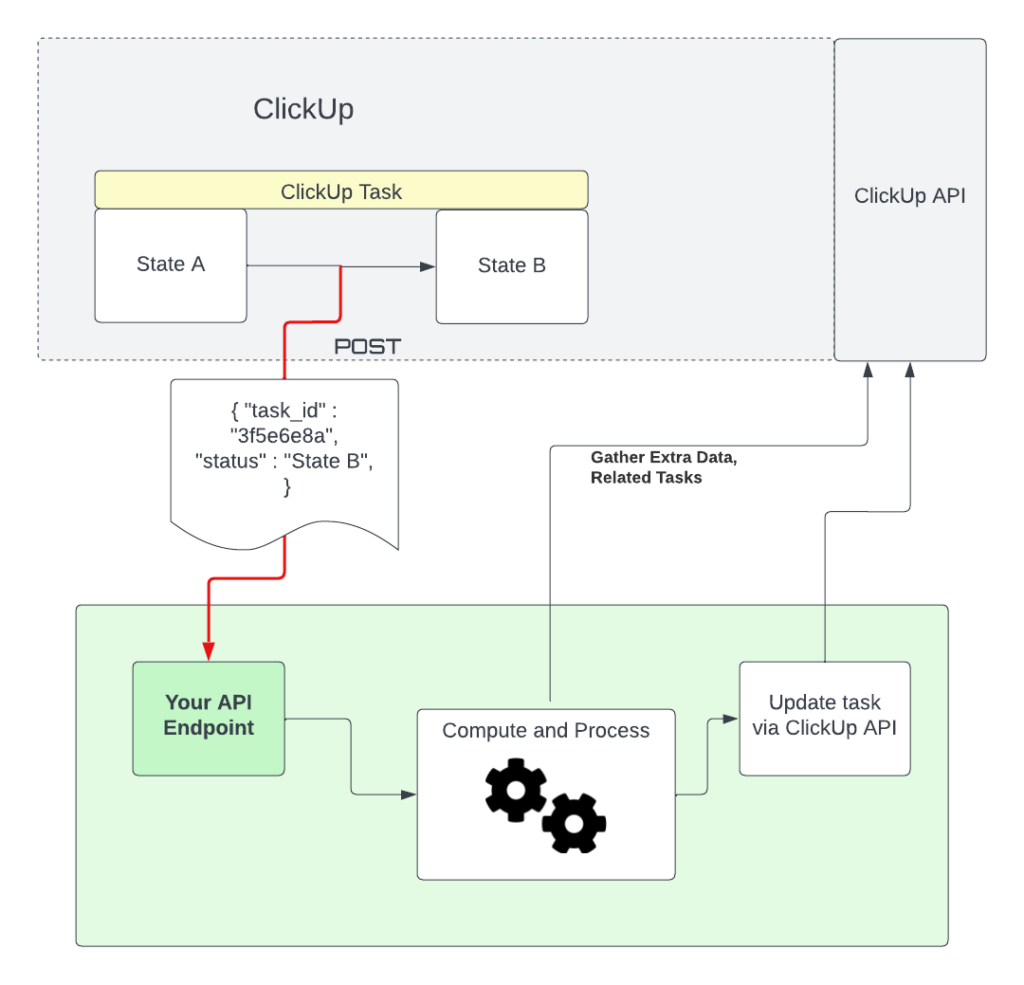
In our automation, we are using ClickUp to trigger a webhook, doing processing, and then using the ClickUp API to update ClickUp itself. In other words, our automation closes the loop by putting the data back in ClickUp.
Scheduling the livestream in Google Calendar using DevFlows
The idea behind this little automation is to set a meeting for both the livestream and a planning meeting, taking place 24 hours before the livestream. The flow is:
- ClickUp is configured to send an automation when a task of type STREAM transitions from PLANNED → SCHEDULED.
- DevFlows receives the webhook, extracts the SCHEDULED_DATE custom field, calculates T-24h, and then creates two Google Calendar appointments
From the ClickUp perspective, you configure the automation using this guide. From the DevFlows perspective, wiring the services together looks like this.
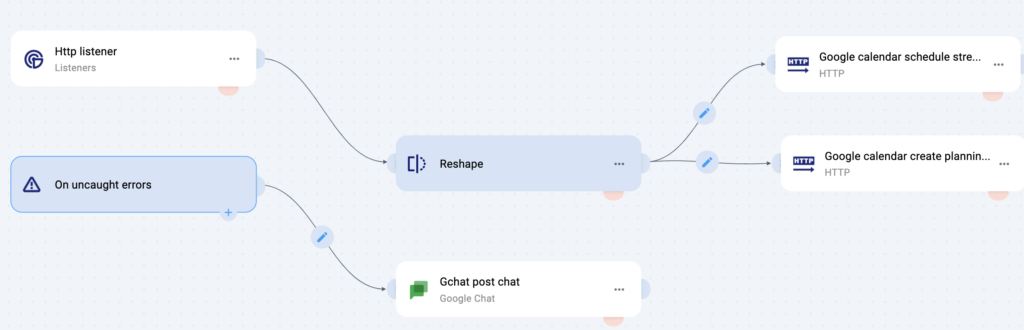
A full DevFlows episode is in the works, and it is not released to the public yet, but this is a good preview of its capabilities. The main idea is that the ‘Http listener’ corresponds to an HTTP endpoint. When you deploy this DevFlow, it gives you a publicly available URL representing this endpoint. This URL should generally be kept secret. The ‘reshape’ node adds some required fields to the `Http listener` node, which can receive any shape of input. The ‘tool’ icons joining the ‘Reshape’ node with the ‘Google calendar’ nodes allow for computations between the input and output nodes. The language of this computation is called Jsonata. You can do a lot with Jsonata, including filtrations, aggregations, type conversions, math, and more. It is very useful for transforming one type of JSON to another. Finally, the Google calendar nodes are what actually create the appointments. The nodes need to be configured with a Google account, but once they are configured they need the key data for an appointment, e.g. start time, end time, description, and guests.
A full DevFlows episode is coming soon. We will update the post when it happens.
Planning the livestream and generating transitions using Lambda and ShotStack
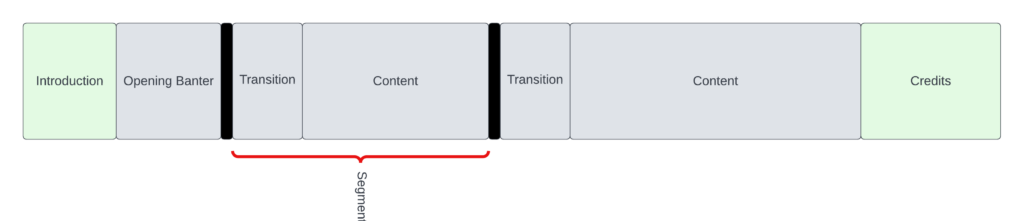
The transitions that we use for the livestream are the videos which break up the segments. The transitions consist of a few frames of black, and then a 9 second animation with a little jingle in the background, reminiscent of elevator music. Within the animation, there is a large white text box which has room for the title of the segment. It looks like this:
The large white box at the top is where the title of the segment goes. Using the ShotStack API, we have a pair of Lambda functions which render the video and then upload the video to an S3 bucket, and then updates ClickUp with the path to the video.
From an AWS perspective, the architecture of the transition system is described by the following diagram. The entrypoint to this system is a Lambda function URL for create-transition.
From a ClickUp perspective, the automation is configured this way:
In words, when a SEGMENT transitions from OPEN → IN_PROGRESS and the task is of type SEGMENT, then call the create-transition Lambda Function URL. This will submit a job to ShotStack, and then puts the job ID into a queue. A separate lambda function, check-highlight-status, is triggered by this queue. If the ShotStack job is in the state done, then download the video from ShotStack to S3, update ClickUp with the S3 URL of the video, and delete the message from the queue. If the ShotStack job is in error, delete the job from the queue. Otherwise, leave the job in the queue and tell ClickUp that the job is “rendering.”
Using Rekognition Segment Detection API to detect the the timestamps of the segments
Once we have a recording, we would like to detect at what times the segments occur. This was one of the most time consuming parts of the livestream process. Recall that we have constructed our transition video to have a black frame at the beginning. When we look at the entire video, it looks like this:

What we want to compute is the time the segments start.
To do this, we are really looking at computing the time between the blackframes. To do this, we use the AWS Rekognition Segment API. To integrate Rekognition into our flow, we have the following setup:
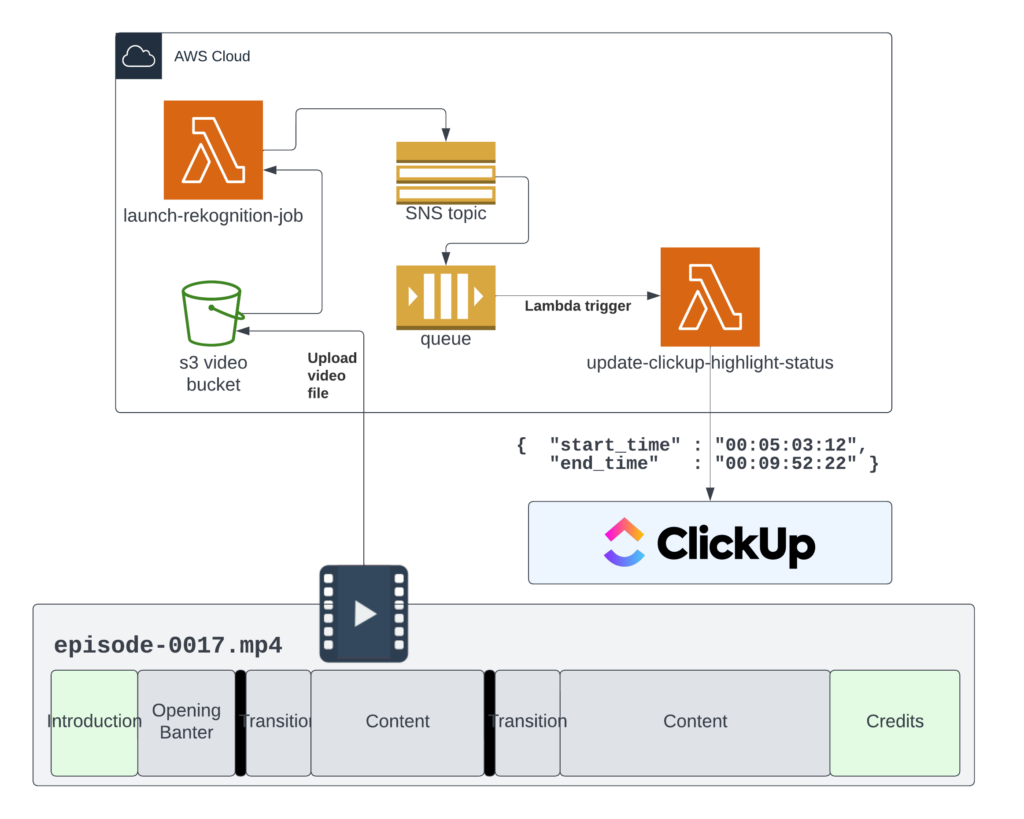
First, we upload the video file in .mp4 format to an S3 bucket. Then, we use ClickUp automation to move the video from Recorded to Postprocessed. This automation is wired to the Lambda Function URL of the launch-rekognition-job Lambda function. This function gets the data from the ClickUp task, in particular the S3 URI, and then launches a Rekognition job. Rekognition jobs are configured to publish their status to SNS Topics. These are perfect for fan-out, push notifications. We have a particular SNS topic which is configured to push to an SQS queue. This SQS triggers another Lambda function.
The second lambda function is triggered when Rekognition finishes. It downloads the ClickUp task associated with the livestream, as well as the segments associated with that task. Since segments are planned in advance, we can anticipate that they will become highlights. The lambda function compares the number of segments associated with stream with the number of segments it detected. If these numbers match, then it will make one highlight per detected segment and automatically associated it with the preplanned segment. If these numbers do not match, it will make highlights but make no assumptions about their contents.
We will be publishing the full source code the github.com/AWSMadeEasy in the coming days. Please stay tuned!